I should start by saying that for now,
skinned avatars have only been tested to work in .cob
format, and have only been created here by using the trueSpace
program. That being said I cannot vouch for, or for that
matter, provide much support for any other method or file
format. A cobdump version has not been written to convert
a skinned avatar from .cob to .rwx format, so it is not
possible to convert them at this time. This may change
down the road.
 I
found that Caligari's version of trueSpace 6.6 did not
work for making skinned avatars in AW at the time of my
testing. This, too, might have changed. They completely
re-did the boning system in 6.6, which rendered it no
longer backwards compatible with earlier versions of TS,
or with working in AW. To the right is an example of the
problems we ran into when using 6.6. I
found that Caligari's version of trueSpace 6.6 did not
work for making skinned avatars in AW at the time of my
testing. This, too, might have changed. They completely
re-did the boning system in 6.6, which rendered it no
longer backwards compatible with earlier versions of TS,
or with working in AW. To the right is an example of the
problems we ran into when using 6.6.
Version 5.1 and 4.2 worked. Version 3.2 does not have
a skeleton system (Jointed avatars seemed to be the rage
back when 3.2 was new); it only has joints, which will
be inadequate for what we want to accomplish.
Starting with the avatar mesh itself:
1) The mesh needs to be one whole piece.
It cannot be in separate pieces and "glued"
together as jointed avatars are. Supposedly it is possible
to make a skinned avatar with parts, but I have not been
able to get one to work in AW. So for now, mesh needs
to be one whole piece. Curious note: While the
mesh must be one whole piece, it is possible to use a
mesh with holes in it... missing polygons. Some Poser
models I had originally used for testing had these holes
or missing polygons.
How it breaks: The avatar acted as though it
were all part of the pelvis and moved like one big stiff
cardboard cutout. It did not render the separate pieces,
eyeballs in this case, in Active Worlds.
2) There does seem to be a limit on the
number of polygons a skinned mesh can have in AW. We tried
the Poser models that had 35,000+ polys and they didn't
work. However, 15,000 did. Unfortunately, I do not know
the actual limit. Bear in mind: though the limit does
seem to be high, the same rules apply as they did with
Jointed: More polygons, the more the computer has to render,
the more it will cut down on frame rate and prolong on
download time (if you don't manage to crash the browser
first). While Skins will need more polygons than Jointed
to move in a smooth fashion, it should be kept as low
as possible. The one avatar I last worked with had about
4,200 polys and moved very nicely, but this was for test
purposes alone. I'm aiming for 5,000 polys at max, but
again, it is not a solid rule. If you are between 1,000
and 5,000, you're golden.
3) The mesh requires at least two textures
or colors to work in AW. Go figure! lol This one took
awhile to figure out. So long as there is more than one,
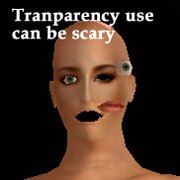
you should be okay. If polygons are painted with any degree
of transparency less than 1, the avatar will break. I
did not try using masks, but I have a feeling the same
rule applies.
 How
it breaks: How
it breaks:
1. If only one texture, or one color, is applied to the
whole avatar, it does the cardboard cutout again.
2. When painting the eye slots invisible (transparency),
I got the result to the right. Scary stuff! Results seem
random. So unless you are doing a Frankenstein test, please,
think of the avatars.
4) A name must be applied to the mesh.
I couldn't find a default one that Nelson (Hamfon) made
for the skin, so I gave the mesh the name aw_back,7. Why?
It was the name that somehow accidentally made it on the
first working avatar, so I figured 7 must be a good number.
;)
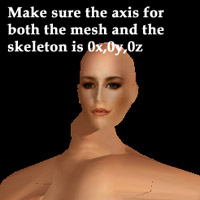
5) Make sure that the axis for the avatar
is at 0, 0, 0 and that it is lying in the 90 deg, 0 deg,
180 deg position, which is the standard for saving jointed
avatars in. Yes, the avatar is built with a skeleton when
it's lying on it's back. Once a skeleton is attached,
the mesh can no longer be rotated in trueSpace, which
is why it is done this way. If the axis for the avatar
mesh is not put in the position as stated above, the avatar
is in danger of breaking, most visibly where joints bend.
 How
it breaks: You will end up with horrible mutation
of the mesh at all the joint areas. The avatar will appear
as though it's being stretched like weird taffy. How
it breaks: You will end up with horrible mutation
of the mesh at all the joint areas. The avatar will appear
as though it's being stretched like weird taffy.
On to the Skeleton:
1) When building the skeleton, the only
bone that is most important is the pelvis. The pelvis
has to be the base. TS doesn't seem to put the skeleton
into a hierarchy like we are used to with jointed avatars.
Nonetheless, as long as the pelvis is the base of the
whole skeleton, all is good. I usually start from the
pelvis, and start building the skeleton down one leg,
then another, then up the back to the head, and finally
each arm. It doesn't matter which way you go to build,
but it's good to finish one limb before going to another.
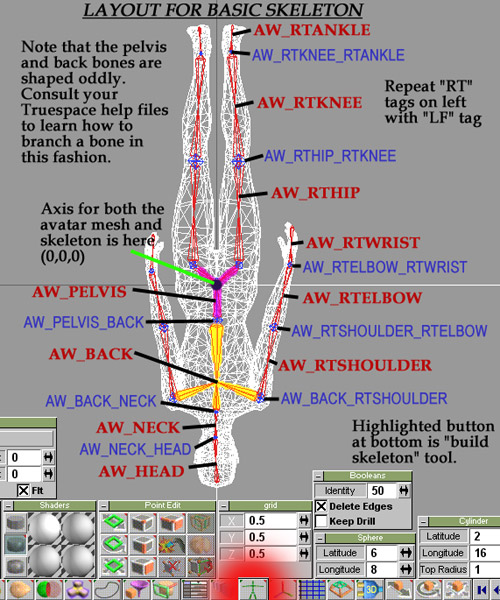
2) Bones are named just as the body parts
of a jointed avatar. I list here the bone tags of a simple
skeleton:
aw_pelvis, aw_back, aw_neck,
aw_head
aw_lfhip, aw_lfknee, aw_lfankle
aw_rthip, aw_rtknee, aw_rtankle
aw_lfshoulder, aw_lfelbow,
aw_lfwrist
aw_rtshoulder, aw_rtelbow,
aw_rtwrist
Below is a picture of what the avatar will look like in
trueSpace as you are working.
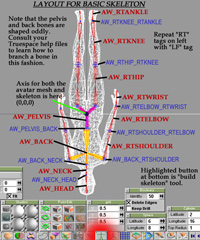
Click image for a larger version.
(opens in new window)
3) The joints that join bones together
also need to be named. They start with the "aw_"
prefix and are followed by the names of the two bones
they are joining.
Ex: aw_back_lfshoulder
List the bone that is higher in the hierarchy first. Bizarre
note: trueSpace 4.2 seems to have a bug where it
sets a limit on the number of characters a joint or bone
can have. Therefore, the joints aw_lfshoulder_lfwrist
and aw_rtshoulder_rtwrist cannot be written in this version
because they are too long. Previous and subsequent versions
of TS do not seem to have this limitation.
4) Once all bones and joints are named,
and they have been positioned where you want them inside
the avatar mesh, make sure the axis for the skeleton is
at 0, 0, 0, and you can now join the mesh to the skeleton
using the button in TS for that purpose. Name the avatar
aw_avatar_v3
Note: It will still be possible to position bones
and joints after joining the mesh and skeleton, but make
sure this step is completed before you go on to assigning
vertices to bones. Otherwise, if a bone or joint is moved
later, all information for the vertices' association will
be lost and you will have to re-do it for the entire avatar.
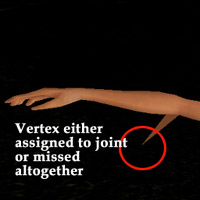 5)
trueSpace will automatically assign vertices to the closest
bones and joints in the skeleton. This is not often how
you would assign them, especially with regard to those
around the joints. No vertices should be assigned
to joints. AW does not currently translate that
information. All vertices in a mesh must be assigned to
bones in the skeleton. Any assigned to joints or having
no association to anything will end up having a mind of
their own and not move with the rest of the avatar. On
the right is an example of what I mean. One vertex was
not attached to any bone and it became a free wanderer
in Active Worlds. 5)
trueSpace will automatically assign vertices to the closest
bones and joints in the skeleton. This is not often how
you would assign them, especially with regard to those
around the joints. No vertices should be assigned
to joints. AW does not currently translate that
information. All vertices in a mesh must be assigned to
bones in the skeleton. Any assigned to joints or having
no association to anything will end up having a mind of
their own and not move with the rest of the avatar. On
the right is an example of what I mean. One vertex was
not attached to any bone and it became a free wanderer
in Active Worlds.
To find out which vertices are attached to a specific
bone or joint, use the "Edit Muscles" tool.
The name deceived me; it took me awhile to learn that
this controlled vertices and not muscles. This tool allows
you to click on a bone or joint, and will highlight the
vertices joined to it. Often times, you will want to change
these mappings. Left clicking on the tool button will
bring up a box that allows you to add or subtract vertices
from a bone, by single vertex or by lassoing and grabbing
a large section at once. Very helpful tool.
This part can be painstaking at times, depending on the
complexity of the avatar... another reason to keep an
avatar as low on polygons and vertices as you can. As
I said, if you later move a bone or joint, all the information
you did for mapping vertices to bones will be lost and
set to the default it originally gave, so make sure you've
positioned your skeleton exactly as you want before assigning
vertices to it.
6) As for adjusting joints and their
angles of mobility and motion in trueSpace... don't, unless
you are feeling bold and adventurous. When I tried to
set or define joints and their angles of motion, it seemed
to create bizarre results in AW, but it hasn't been fully
tested.
On a final note: trueSpace will save
the avatar in the default position of the skeleton. For
instance, if you had your avatar lying with arms out to
the sides before the skeleton was put in, then add a skeleton,
and finally position the arms down, it will save it with
the arms up. It saves that as the default position. This
is good and bad. Good because it allows you to move the
limbs of the avatar around in trueSpace while you work
without fear of it being saved in some strange way when
you are done. Bad because sometimes you'd really like
to change the position it's saved in... who wants an avatar
with arms flapping out like a bird?!
Attaching vertices such as those under the arm or around
the legs is much easier when the limbs are spread out,
but if a skeleton has that as its default position, then
it is saved that way in the final avatar. I've tried finding
a work-around for this, and haven't come up with any very
good solutions. This, along with the highly touchy system
of moving limbs on a skeleton and a few other tricky problems,
is among the reasons an alternate program is being considered
to make the process of skinning avatars easier.
Do not try to convert the .cob to an
.rwx. I know, some of us love rwx. We do so much editing
in .rwx. But the versions of cobdump we have at present
cannot handle converting skinned avatars. It has to be
used in a zipped .cob file format for AW. Make sure you
put avatarname.cob when calling for it in the
.dat file
Well, there it is. Not for the faint of heart, but I hope
it helps someone out there. If you want to test and try
in other programs using the guidelines that are set out
here you are more then welcome to.
Assistance for creating skins, whether artistic or technical,
is not available at this time.
|