|
|
Artist TipCourtesy of SWE World of 3DS Max
-Creating the
crate. -Converting to
RWX.
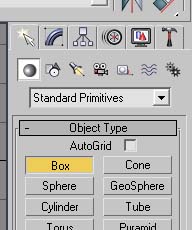
Creating your first objects Ok, lets get started! Creating a box: Start off with a new scene (well, if it isn't new, then you don't really need to read this part of the tutorial!). on the right tabs, chose the create tab, and the Geometry button, and Standard Primitives in the drop down menu.
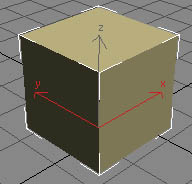
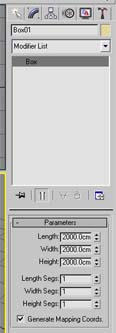
Next, in the Top viewpoint window (top left corner by default) click anywhere on the screen, and create the box. You do this by clicking and holding, moving the mouse, clicking again, moving the mouse to set the height, and click a final time! Explanation might not be so good, but it's really easy, believe me :). Setting the size: To modify the size, first select the box we had just created (by clicking on it), next, on the tabs, choose the modify tab (second tab from the left, a rainbow as the icon). Go down to the parameters section. And for length, width and height enter "20m" (don't worry, will be scaled down when converting in accutrans)
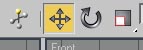
Setting the position: To set the position, in the
top tool bar (under the menu) choose the Select and move icon
You should now have a box that looks something like this:
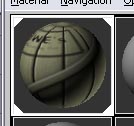
Texturing the crate: Ok, now lets make it look pretty! Creating the material: To create the material,
first click "M" to open the Material Editor. Select any of the spheres, move
down to the blinn basic parameters roll out, and choose the small box next to
the Diffuse colour box Texturing the crate: To texture the create, just click on hold on the sphere of your newly created material , move your mouse pointer to the box in the viewpoint, and release.
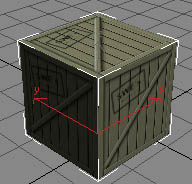
UV mapping: Even though the box might look like it doesn't need any UV Mapping, other more complex objects will. To UV Map the object, select the crate object, go back to the modify tab, and in the drop down list titled "Modifier List", choose UVW map( 7th option from the bottom) . In the parameters roll out, select box, and there you go! Your current crate should look something like this:
Modifying the crate: Though we don't actually need to edit the crate, the ability to edit objects is very useful, so going to just stick it into this tutorial! Setting crate up for editing: There are 2 ways to make an object editable, either right click the object, and in the pop-up menu, choose Convert to>Editable mesh. The second way is to select the object, go to the modify tab, and in the drop down menu, choose Edit Mesh. This tutorial will use the second option, as it is easy to get the object back to its unedited form. Editing the crate: Ok, now that your crate is editable, just select what you would like to edit (i.e.: The points, lines, or whole faces) from the Selection roll out. then you can edit them just as you edit a normal object. It really is too simple to get into too much detail.
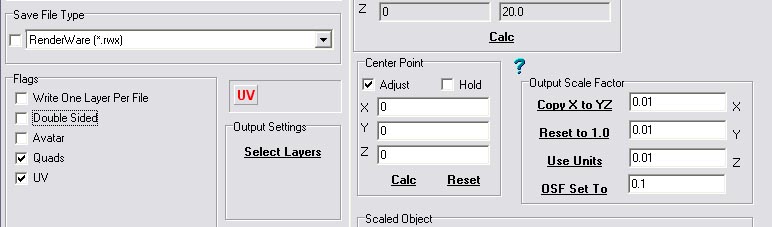
Converting the crate: Exporting as 3DS: When you are done modifying your object, and think it's ready for use, go to File>Export. Change the save type to VRML, and save your object to a suitable location. Converting in Accutrans: Open accutrans, go to File>Open as>VRML and locate and open your object. you should now be able to see the object in the 3d window. Go to File>Save as. select the type as RWX, and the scale as 0.01, and then choose save.
And there you go! now just zip the object, and upload it. NOTES:
If you have any comments and crits or questions, feel free to e-mail me at swe@swehli.com . You can also visit tls2.swehli.com (well, its almost empty right now), which will soon be full of tutorials and free objects :).
|
| Active Worlds | Newsletter Home | Newsletter Archive | Contact Us | Disclaimer |
 .
Next, in the 3 boxes at the bottom, named X, Y and Z, put a value of "0" for
them all. this will center the object in the middle of the screen.
.
Next, in the 3 boxes at the bottom, named X, Y and Z, put a value of "0" for
them all. this will center the object in the middle of the screen.