|
|
Avatars101Courtesy of SWE Welcome to my step-by-step guide to making avatars. This tutorial will be based mostly on AccuTrans (www.micromouse.ca). Please note that AccuTrans is not free but you can download a trial version from its respective web sites. After the trial time is over you must pay the license fee or uninstall the program! Check www.micromouse.ca for complete details. This tutorial expects you to know how to model. You can also download an avatar from objects.activeworlds.com/aw/avatars and re-tag it using this tutorial. SketchingThe most important part to making a good, low poly avatar is sketching your design first; preferably on sketch paper. If you sketch first you will not have to figure out how you will do everything later and you will know how many vertices and polys you will use to make the av. I can't teach you how to do the sketch but I can give you some tips. :) First, always draw it from at least 2 angles but preferrably 3; one from the top, one from the front, and one from the side. Second, marking every vertex on your drawing using an 'X' will help you find the vertex later on in the modeling period. And third, draw the body parts separately. The body parts you will need to draw for a normal avatar are: 1-head
ModelingFirst, make all the different body parts you need. It is important to make each body part separate. (Don't make a full arm; instead make a hand by itself, lower arm by itself, and upper arm by itself.) After you have done this, get your textures ready and apply them to the avatar parts and then place all the object pieces together. (You're a modeller. You know how to do this! :)) After you have done this, save the object then bring up your AccuTrans program. TaggingOk, this is what this tutorial is mainly about! Tagging the object and transforming it into an avatar! First, in AccuTrans, open your avatar model. You do this by clicking file>open> then choose the type of file you wish to use. In this case it's TrueSpace (*.cob,*.coa,*.scn). After you locate the object and load it into AccuTrans, in the menu click Edit1>Make Avatar.
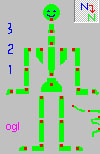
After you click Make Avatar you should notice the toolbar on the right has changed. It now has a picture of an avatar (little green man). There should also be 5 tabs to choose from, Tags, Joints, Action, Move and Tree. Next, you should notice there is a part of the av highlighted. This is the selected object. To tag it you first take note of which part of the body it is and click the corresponding button on the little green man. So, say if the lower left leg is the selected object, click the lower left leg button. Which button is for what part of the body should be obvious but, if you are not sure, put you mouse pointer over the button and it should tell you. Next, tag the other objects according to what each will be used as. (ie. The right lower leg, as, yep you guessed it, the right lower leg tag.) To select diffrent parts of the avatar, click on the button that has > or < on it. The buttons should be under the green man. Now, say your avatar is wearing a cap and you want the cap to move with the head. What you do is make the cap a child object of the head so it moves with the head. How you do this is first, select the head object (or whatever other object you want the hat to move with) and tag it as the head. Next you select the cap and also tag it as the head. The program should say something like "this layer already exists, do you want to create a child?". Click yes!
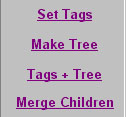
Next, in the tab bar on the right, there should be 4 buttons: Set tag, Make Tree, Tags + Trees and Merge children. Click on Make Tree. Once again, when the message box pops up, click yes, and there you have it - a cap that stays on the avatar's head! After you have done this, click on the joints tab. Here you decide the position of the joints. The avatar has an axis the object turns around so place the joints where the joints will be in a real body. A joint should be marked as a little red dot and you might even miss it sometimes. To move the joint position around, click, hold, and drag on the <> button next to the text boxes with either x, y or z next to them. This determines in what direction the joint is moved. Once again, to browse through the different objects, use the buttons marked either < or > which are located a little bit under the green man. After you have done all of this, click on file>save as, and select renderware from the drop down menu. Click the Avatar check box. Next Save it and there you have it - your first ever avatar! If you have any questions, problems or find anything wrong in this tutorial, please e-mail me at swe@emptyco.com. Useful links: www.3dcafe.com - all types of tutorials for all types of graphic programs. ts.oriox.com - tutorial for using TrueSpace in activeworlds. www.activeworlds.com/help//cob.html - cobdump website, used to convert files from .cob and .scn format, to rwx or seq, also has tutorials on making avatars completely in TrueSpace. The Active Worlds community if full of knowledgeable citizens. If you would like to share with the community a "how to" tip or tutorial, contact us at newsletter@activeworlds.com.
|
| Active Worlds | Newsletter Home | Newsletter Archive | Contact Us | Disclaimer |