|
Artist Tip
Courtesy of Elyk
The first thing you'll want to do when you get into TrueSpace is to locate your toolbar and make sure you know where everything is.

To start your soda machine object, you'll want to begin by adding a cube to your project by using the object icon.  For most of the icons, you can click and hold for a detailed menu. If you wanted to use another starter object besides a cube, click and hold on the object icon and a list will come up displaying more starter objects. However, we'll need a cube to make a soda machine. For most of the icons, you can click and hold for a detailed menu. If you wanted to use another starter object besides a cube, click and hold on the object icon and a list will come up displaying more starter objects. However, we'll need a cube to make a soda machine.
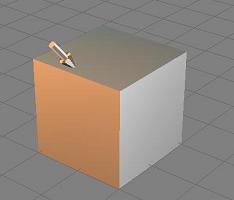
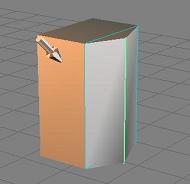
Once you select a cube, it should show up in the background like this:
You can move around the object by using the movement icons.  Most are pretty self-explanatory. To rotate around the object, click the rotate icon and click the left mouse button and hold to rotate horizontally around your object. If you want to rotate vertically, click and hold the right mouse button. This will work for most movement icons when moving your object, deforming and rotating the object as well. Most are pretty self-explanatory. To rotate around the object, click the rotate icon and click the left mouse button and hold to rotate horizontally around your object. If you want to rotate vertically, click and hold the right mouse button. This will work for most movement icons when moving your object, deforming and rotating the object as well.
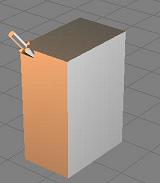
The next thing you'll want to do is stretch your object to the right shape of a soda machine using the movement icons for your object.  Click and hold this icon for more movement details, you can choose to rotate, move and stretch your object. You'll want to stretch your cube so that it is narrow and tall to look more like a soda machine's shape. Click and hold this icon for more movement details, you can choose to rotate, move and stretch your object. You'll want to stretch your cube so that it is narrow and tall to look more like a soda machine's shape.
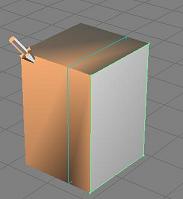
After you get the cube to the right shape, you'll then want to sweep the front of it to round outward like a soda machine usually looks (this is optional but makes the soda machine look a bit more realistic). To sweep the object, click on the "sweep" icon.  You'll get a message that states "no face(s) selected." Do not worry, simply click the front of the object (part that you want to round) and a green highlight will appear around that portion of the object. Next, click the "sweep" icon once again and a new addition will appear on your object. You'll get a message that states "no face(s) selected." Do not worry, simply click the front of the object (part that you want to round) and a green highlight will appear around that portion of the object. Next, click the "sweep" icon once again and a new addition will appear on your object.
You can now use the menu 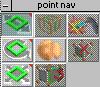 that will pop-up after selecting the portion you want to sweep and deform. Click the bottom left icon in that menu (point-scale) and deform the front of the addition using the left click button on your mouse. This will squeeze the addition in horizontally to give it a rounded out effect. that will pop-up after selecting the portion you want to sweep and deform. Click the bottom left icon in that menu (point-scale) and deform the front of the addition using the left click button on your mouse. This will squeeze the addition in horizontally to give it a rounded out effect.
After you are finished and get the object to the perfect shape, click the "deform" icon  to make it official. Next you'll want to add your textures to the object. Click on the paintbrush icon to make it official. Next you'll want to add your textures to the object. Click on the paintbrush icon  and you should get a large list of attributes and settings to set the paint styles. and you should get a large list of attributes and settings to set the paint styles.
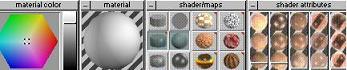
Right click the "shader attributes" section to get a shader settings menu. 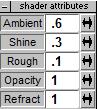 Since we are using version 3.0 you'll want to set your shader settings to .6 .3 .1 as displayed. This will give your object the perfect lighting in AW and will not cause it to be too dark or too light. Next, click on the texture icon in your paint settings (checkered ball icon). From here you can set the texture by browsing through your files to the texture you want to use. After selecting the texture, use the paintbrush to paint it on the front section of the soda machine. It may come out scrambled on the object, so for this, you'll want to set the UV texturing settings to fit the object. Click on the Material library icon (3 colored balls) and then select the UV projection icon Since we are using version 3.0 you'll want to set your shader settings to .6 .3 .1 as displayed. This will give your object the perfect lighting in AW and will not cause it to be too dark or too light. Next, click on the texture icon in your paint settings (checkered ball icon). From here you can set the texture by browsing through your files to the texture you want to use. After selecting the texture, use the paintbrush to paint it on the front section of the soda machine. It may come out scrambled on the object, so for this, you'll want to set the UV texturing settings to fit the object. Click on the Material library icon (3 colored balls) and then select the UV projection icon  This will allow you to select the shape that the texture should fit. In this case you'll want it to fit the shape of a cube, so select the UV icon for a cube and the texture should then fit correctly onto your object. You can also color the rest of the soda machine a black color or texture it a metal color to make it look like a real soda machine.
You'll want to move around your object using your movement icons in order to texture and color the entire object.
After you are finished texturing and coloring your object, you'll want to set the objects axis so that your object will rotate properly in AW. To do this, go to the "toggle grid mode" icon (blue grid icon) and select from that group, the "axes" icon.  After you select this, an axis should appear near or above your object. After you select this, an axis should appear near or above your object. 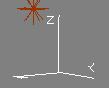 Using your object movement tools, move the axis to the center of the object and then double click the object to set the axis. Using your object movement tools, move the axis to the center of the object and then double click the object to set the axis.
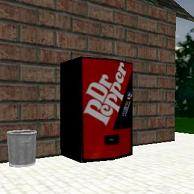
After you have finished setting your axis, make sure you size the entire object to the right size for AW. I usually measure it next to a cube, since an avatar in AW is generally around the size of a cube in TrueSpace. Once you've done this, you'll want to make sure your location and rotation of the object is set to 0. Right click the "object tool" icon (white arrow) and your object info will appear.
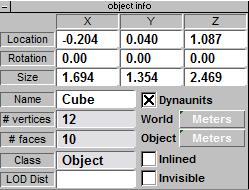
Make sure you set the rotation and location all to 0.00 all the way across in each category. This will make it so that your object doesn't show up a few coords in the air in AW. The object should appear level with your avatar, if you've set everything to 0.00.
Once you are finished with all of this, save your object. You can use the cobdump program to convert your object to .rwx for AW.
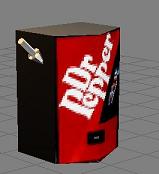
After you are finished, you should have a great soda machine object for your world.
|