Last year marked a change for me with regard to the 3D modeling program I use to make content for the AW environments. I've made a switch to Blender and it's opened many new avenues for me when it comes to making great-looking objects and avatars. But like any great tool, it requires effort to learn to use it effectively, and in this case, it even involved some hair-pulling and screams of insanity from time to time.
When I first tried Blender years ago, there was very little in the way of documentation, tutorials, or help files. Today there are wikis and web sites, tutorials and books, and a whole community of Blender-enthusiasts to offer help and guidance. But tracking down the specific information you need when trying to learn Blender can still be a bit frustrating. That struggle is what made me decide to begin writing some tutorials of my own, starting with the basics. So without further ado, let's take a look at our new program.
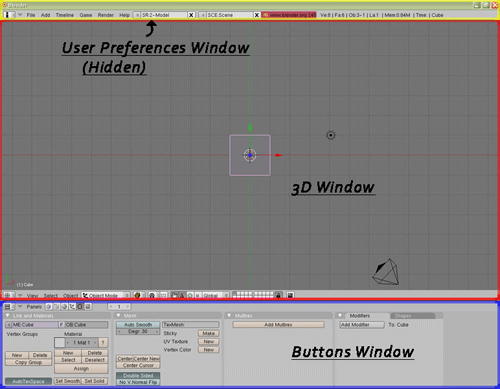
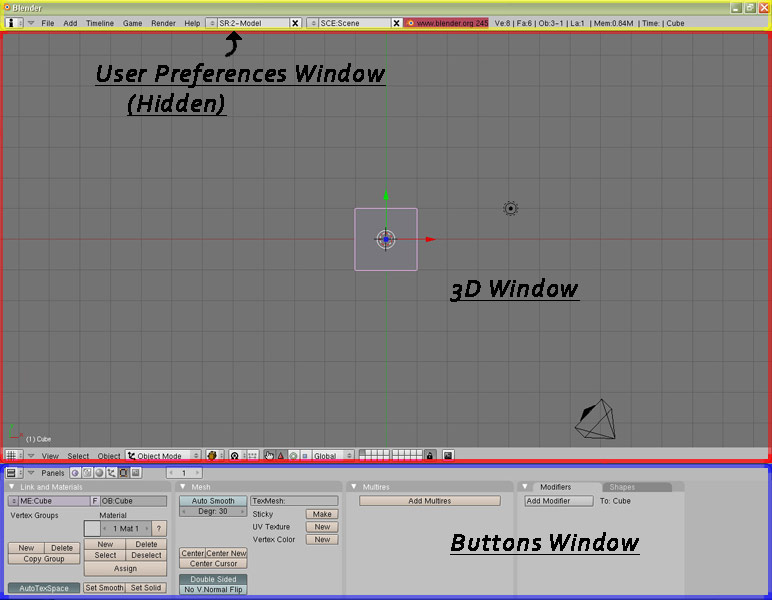
Fig. 1 Click for larger view
For this tutorial, I will be using Blender 2.45, but I think you will find that most of the Blender versions look similar when you fire them up. The picture above shows you what you will be greeted with. The screen is made up of three individual windows, though one is hidden. The large window that dominates most of the screen is the "3D View" window. The one below that is the "Buttons Window." And at the very top of the screen, you'll notice what appears to be a bar. This is our third "hidden" window, "User Preferences." We're going to want to take advantage of this hidden window first before we do anything else in Blender.
If you are like me, you are used to left-mouse clicking a selection for almost any program you use. Blender is, by default, set to having the right-mouse selection enabled. I tried for weeks to get my mind to adapt to this and was by the end, totally frustrated. Then I learned I need suffer no more. So let's open up this hidden window. It's just like widening a window in Active Worlds. Run your cursor over the bar until you get the double-ended arrow and right-mouse drag this down.
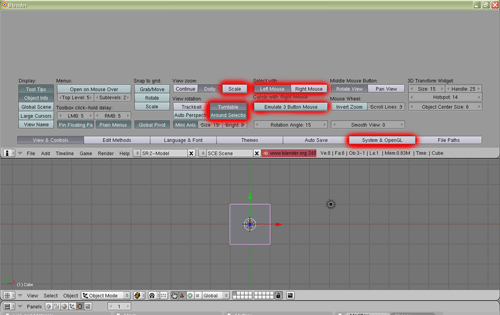
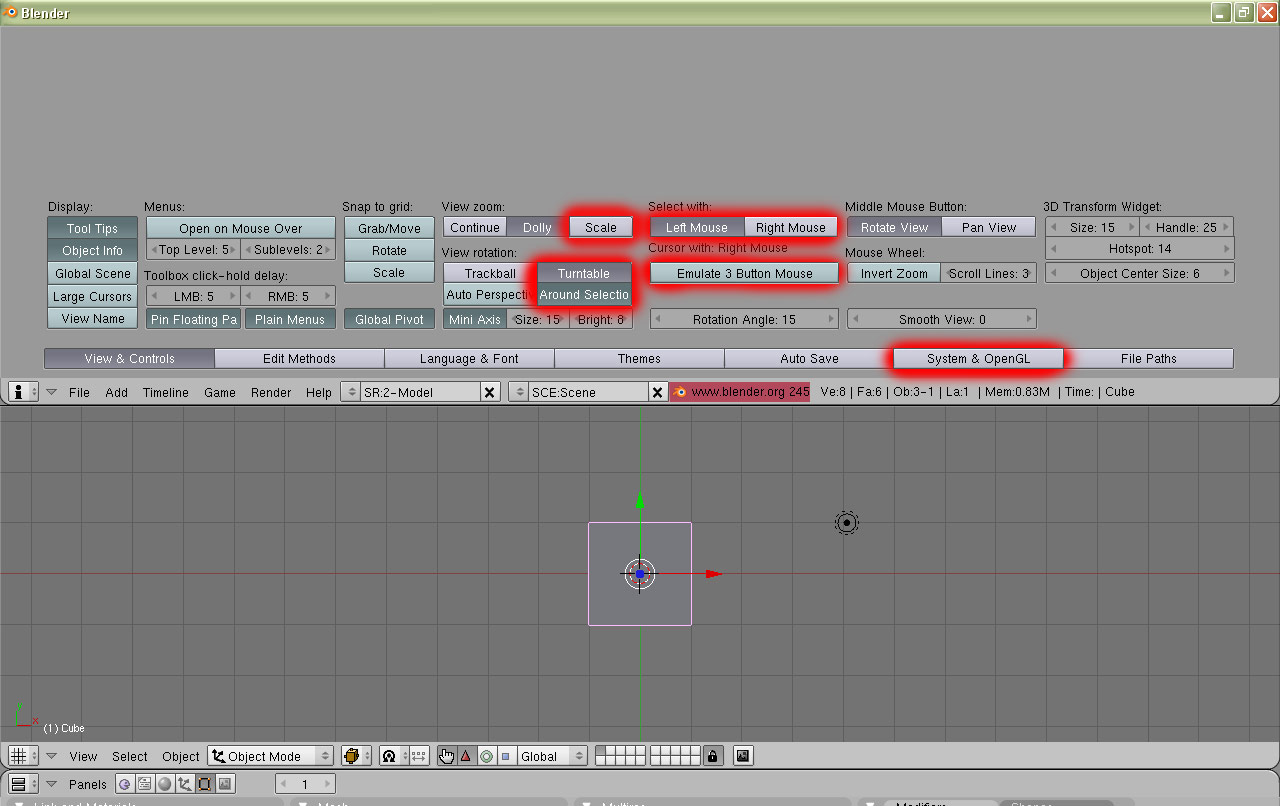
Fig. 2 Click for larger view
There's our hidden control panel. I've highlighted some of the controls we may need to change. First off, change "Select With" to "Left Mouse." Next let's change the "View Rotation" to "Turntable" and "Around Selection." It will be much easier to work on and view what object you have selected with these options. Also change "View Zoom" to "Scale."
Now for those new to this program, Blender is very strong in using hotkeys to keep the workflow moving smoothly as you model. That being said, it makes ready use of the normal keyboard as well as the numpad and all buttons on the mouse: left, right and middle.
What if you are working off a laptop? What if you are on a Mac? What if you don't have a middle mouse button? Tracked down some information that will help in these situations: https://en.wikibooks.org/wiki/Blender_3D:_Noob_to_Pro/Non-standard_equipment.
You'll note that I highlighted the "emulate 3 button mouse" and "System & OpenGL" buttons in our control window in the picture above. Those are areas that you will need to access if you have any of the above limitations. For ease of explanation though, this article will work with a Windows computer system, full keyboard, and middle-mouse wheel.
Once you've adjusted all the settings you need to, slide that window back to it's hidden position. Looking at the large 3D Window you will note a box with colorful arrows in its center. They call the colored arrows a 3D transform manipulator; I call it annoying. It can be turned off if you find it distracting too. Look along the toolbar running along the bottom of the 3D Window for an icon with a hand, finger pointing up. Click that to switch the 3D transformer off and on.
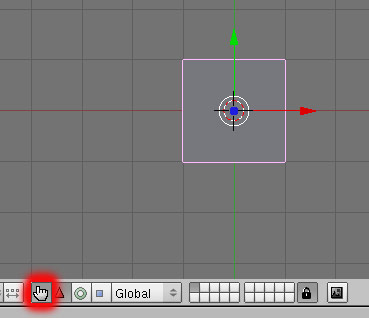
Fig. 3
Okay, now that we have our controls set up the way we like, we want Blender to remember them automatically every time we open up the program. Two options for doing that: a) Click the tab "File" at the top of the screen and then click "Save Default Settings" from the drop-down menu, or b) get a jump-start on using hotkeys in Blender by hitting "Ctrl" and "U" and then clicking "Save user defaults" to confirm that request. If you don't click that little "Ok" window, it will disappear, but it will not actually perform the operation you initiated. This is helpful later if you click on something and decide you didn't want to do that operation, you simply don't click in the "Ok" window and it aborts. But we do want this to be saved, so definitely click on it to follow through.
You've taken the first step to making Blender work for you. Let's break down a few more things before we begin modeling.
3D Window Views
Right now we have a cube in the view port. We're looking at it from the top view. Click and hold your middle mouse button (or applicable button for your setup) in the 3D Window while sliding your mouse around. This allows you to rotate your view around the object in any direction you like. Releasing the middle mouse button stops this. Now let's say you want to look at a specific view of your object again. Make sure NumLock is enabled for your numpad. "1" on the numpad will take you instantly to the front view of your object, "7" is top view, "3" is left-side view. Holding down "Ctrl" while you click those same numbers will reverse the view, so "Ctrl" and "1" will give you the back view, "Ctrl" and "7" the bottom view, and "Ctrl" and "3" gives you the right-side view of your object. You've just learned how to see your object in all its splendor.
Modes in Blender
Coming from trueSpace, it was hard to understand this concept of "modes" at first. Anything I wanted to do to my object in trueSpace I did by just clicking little icon buttons. Texturing, vertex manipulation, bone construction... there were no divisions of labor, they were all there together. Blender on the other hand has specific "modes" you go into depending on the task at hand. Understanding them ahead of time will make going between them that much easier.
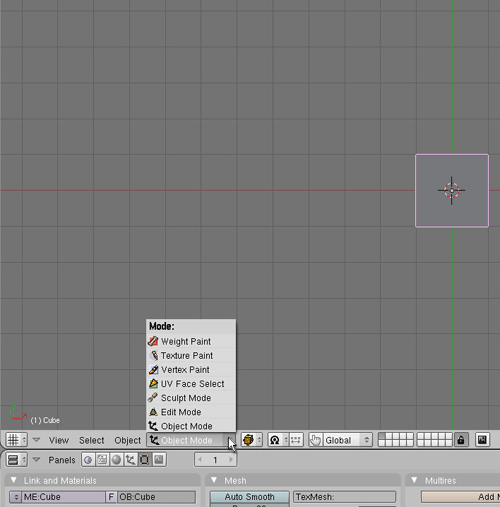
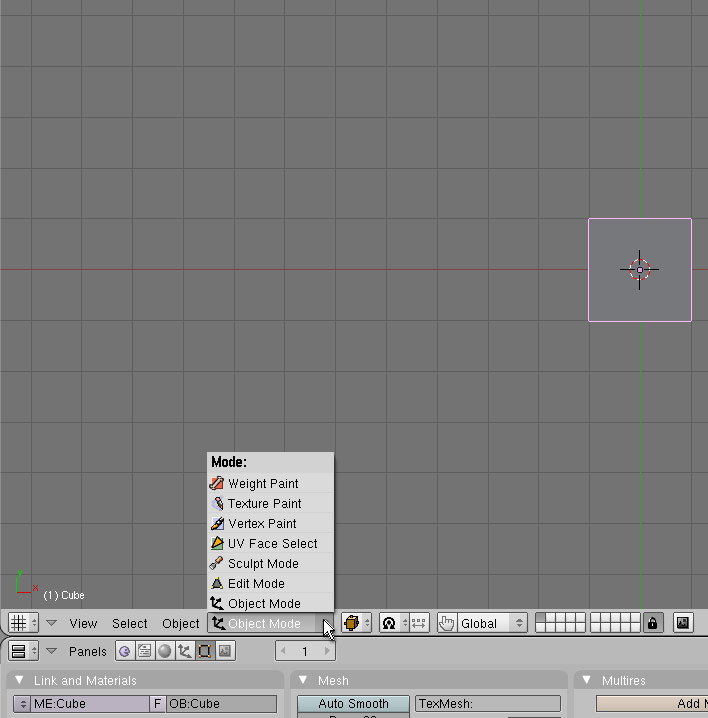
Fig. 4 Click for larger view
This is where you can find your different mode options. Depending on what version of Blender you are using, you may be missing a few of those pictured or have extra ones. You'll notice by default we are in "Object Mode." "Object Mode" and "Edit Mode" will be the modes you use the most while modeling, so the Blender programmers made it easy to cycle between the two modes with a hotkey, the "Tab" key. If you forget the hotkey, just mouse over the "Mode" slot and it will remind you of the hotkeys, or you can pick them directly from the drop-up window that appears when you click on the "Mode" slot. Let's briefly go over a few of the "modes" and what you can perform while in them.
Object Mode: This handles anything you want to do with your object as a whole. Scaling the whole object, moving the whole object, duplicating the whole object, revolving the... well, you get the picture. As long as you want to do something to the object as a whole, do it in this mode. This mode is also good for seeing what your object will look like as a finished product.
Edit Mode: Anytime you want to edit small areas of your object, this is the mode to go to. Want to move a few vertices, extrude a few edges on your cube, reverse the normals on several faces, convert a square face to triangles or vice versa... anything that has to do with modification on sections of your object, this you do in edit mode. In fact, most of your intense modeling will be in this mode. Remember, Object Mode: whole, Edit Mode: section of your whole.
UV Face Select Mode: This mode does not exist in version 2.48 because it was combined with Edit Mode, but in all other past versions, it's in its own slot, and as you can guess by the name, this puts you in texturing mode. UV mapping, unwrapping, texture rotation, anything that has to do with texturing is done in this mode.
Weight Paint: If you are going to get into doing avatars, this mode will become important to you down the line. This will allow you to assign weighting to the vertices of your avatar for one or more bones in the skeleton.
We'll cover one more section in this article:
Making New View Windows
Right now, we have one 3D Window that gives us one view of our object. But what if we want to have more than one view of our object at a glance? What if we want to have other windows like the "UVImage/Editor" that shows the texture we are working with or an "Outliner" window that lists all the objects we have in a scene? How do we get those?
Setting up (and by reverse, deleting) extra windows is quite easy in Blender and allows for a lot of personal preference. Let's start by dividing our 3D Window in half. Run your cursor to the center of the hidden window bar until you get the double-ended arrow and right-click (yes, right, not left). From the popup that appears, left-click on "Split Area" and then slide the divider to where you want and left-click to place. Voila, two windows! Now place your mouse in the middle of this new divider until you get the double arrow and repeat the process. You have three windows now. Place your mouse pointer inside a window and set it to the view you want with your numpad hotkey numbers. Do the same with the remaining windows. You do not have to click inside a window to make it active, you simply have to move your mouse pointer inside that window's confines and Blender knows automatically that's the window you want to work with.
You can repeat the creating of any number of windows. Getting rid of a window is just as easy. Just run your mouse over the divider until you get the double arrow, right-click, then left-click "Join Areas" and a darkened area with an arrow pops up over one of your windows. If it's pointing in the wrong direction, slide your mouse in the direction it should be collapsing your window and then left-click. Boom, now it's gone. That simple.
This was an article to get us acquainted with Blender's setup and basic layout. I didn't have this when I started which made for huge amounts of frustration (wow, Stacee, why is your keyboard smashed to pieces), and I'm hoping I can help ease others into using this program in a much gentler fashion. Blender really is a versatile and powerful program when you finally figure it out. Now that we've laid this groundwork we will be able to get into some simple modeling in the next article.
Download Blender FREE
Hone your 3D modeling skills with Blender articles in future editions of the AWNewsletter!
|