|
|
|
Putting an Avatar Together
Courtesy of Stacee
 You've
managed to make all the parts of your avatar, and now, how do you get
it to come to life and move? This tutorial will hopefully help you get
started. Avatars are a bit tough, so hang on to your seats. Let's see,
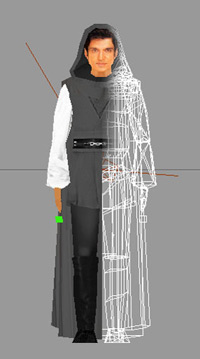
I have my Jedi avatar ready....we'll use him as the guinea pig. hehe You've
managed to make all the parts of your avatar, and now, how do you get
it to come to life and move? This tutorial will hopefully help you get
started. Avatars are a bit tough, so hang on to your seats. Let's see,
I have my Jedi avatar ready....we'll use him as the guinea pig. hehe
Axii Rotation
First off, make sure you have all the axii of each limb placed where you
want that limb to rotate. This is important. If you have the axis for
the upper arm in the middle of that piece, it's going to rotate from the
middle, not at the shoulder where you want it to. Also make sure that
all the rotations for the axii are set to 0,0,0. Avatar should be facing
forward.
Tag Names
Next step....naming the pieces. For a list of all the tags that can be
used for an avatar, go here: https://www.activeworlds.com/help/aw36/rwx_tag.html.
Several more have been added for 4.x, but these listed already give great
flexibility. Note: A tag does NOT have to be used for the limb it describes.
For instance, say you have a snake with a tail made up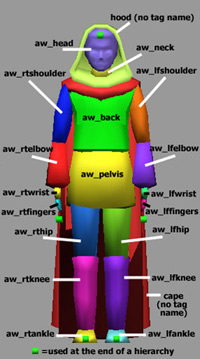 of 8 pieces...and there are only 4 tail tags. Any of the other tags may
be used. Just make sure that whatever tags you use are reflected in the
seqs that you make to go with it. The only tag that is not transferable
is the pelvis tag. This is the root of the whole avatar, and must be used
as the pivotal base tag. I've grabbed my avatar and named the pieces with
aw_nameofthetag. (see pic right) You might notice that not every piece
actually got an "aw_" tag. Why not? Only pieces that you actually
want to perform in a seq should have a tag name. The hood and cape in
this case we don't want to move. Gets too messy. So we kept the tags off
of them. We'll end up attaching them to other body parts that will make
them move with the body, but not with a mind of their own, so to speak.
of 8 pieces...and there are only 4 tail tags. Any of the other tags may
be used. Just make sure that whatever tags you use are reflected in the
seqs that you make to go with it. The only tag that is not transferable
is the pelvis tag. This is the root of the whole avatar, and must be used
as the pivotal base tag. I've grabbed my avatar and named the pieces with
aw_nameofthetag. (see pic right) You might notice that not every piece
actually got an "aw_" tag. Why not? Only pieces that you actually
want to perform in a seq should have a tag name. The hood and cape in
this case we don't want to move. Gets too messy. So we kept the tags off
of them. We'll end up attaching them to other body parts that will make
them move with the body, but not with a mind of their own, so to speak.
Gluing Things Together
Okay, have the axii done, and named the body parts of your avatar with
tags. Now, comes the crazy part...gluing this guy together. Notice the
little green cubes at the end of limbs (tips of fingers, head, feet).
These little guys don't get tag names either. Their sole purpose is to
let AW know that it is the end of a hierarchy. Since the piece at the
end doesn't get to actually move, these little buggers are great for the
job. They allow all the ones above them to do the moving, while they just
come along for the ride. You don't want them showing in the final product
though, so you have three options to make them invisible. 1) hide them
inside the avatar, 2) turn the opacity on them to zero, 3) paint them
with delete.jpg and then erase those lines of code from the .rwx of the
avatar later on.
Got your little cubes in place? Still sane yet? lol Not for long. Now
comes the frustrating part. Let me explain the two glue buttons we'll
be using, "Glue as a Child" and "Glue as a Sibling".
Think of the avatar you are making as a family. Certain members will have
to listen to members that are higher, like a child to it's parent, and
some will be equal to each other, like siblings. Not hard to see that
you will want a hand to be a child to an arm, and that the left arm will
be a sibling, or equal to, the right arm. Let's glue now, starting with
a leg. Click on aw_rtankle. Then click on "Glue as child" and
click on the little cube that should be near, or in, aw_rtankle. You just
made the cube a child of the rtankle. Now, click on the "Object Tool"
(icon looks like an arrow in Truespace). Click on aw_rtknee. You should
no longer have the rtankle and it's cube highlighted. Having aw_rtknee
in your possession, click on the "Glue as child" button again,
then click on the aw_rtankle. Hit "Object Tool" again, click
on the aw_rthip, then "Glue as child, and then aw_rtknee. Your whole
right leg should be glued together at this point, and not just glued together
funny, but in an actual order! Cool beans! Okay, repeat with the left
leg.
Same method applies for the arms. Click on the aw_rtfingers, "Glue
as child", cube. Click on aw_rtwrist, "Glue as child",
aw_rtfingers. Click on aw_rtelbow.....well, I think you see where this
is going. Right up to the shoulder. Repeat with the left arm.
Head time. Okay, this is where things get a bit tricky. We have a hood
that we don't want to move on it's own, but we DO want it to move with
the head. Click on the aw_head. Click "Glue as child", then
click on the cube. Now, here's the change, click on "Glue as sibling"
and then click on the hood. What did we just do? We took the head and
glued the cube as a child, but, we also went and told it that we want
to glue the hood as a sibling of the head, making it move together. All
good! Click on the "object tool", click on aw_neck, then "Glue
as child", and click on the head. Now that's done. We're nearing
the home stretch.
We have all the limbs done. Now it's just the body left. Start with the
top half of the body. If the back moves, we want all of the limbs attached
to it to move along with the back. And don't forget here about our cape.
We want the cape to move with the back. One arm greater then the other?
Can the arm get along without the head? Nope, we want all the limbs to
be equal, or siblings, and all of them to be subject to the back as a
parent. How to do that? Click on the "object tool", then click
on aw_back. Pick up the "Glue as child" gun, and click on the
right arm. You just made the right arm a child to the back, as it should
be. Click on "Glue as sibling" now and click on the left arm,
and then click on the head, and finally, click on the cape. You just told
it that you want the left arm, head, and cape to be equal with the right
arm, and all of them are children to the back. Top half of body done!
Final gluing step here. Okay, when the pelvis moves, we want the legs
to go with it, and we want the top half of the body to do the same. Therefore,
back=left leg=right leg. All children of the pelvis. Click on the "object
tool" and then click on the aw_pelvis. Pick up the "Glue as
child" gun again, click on the right leg, then grab "Glue as
Sibling", and click on the left leg, then the upper part of the body.
Whole avatar should now be in one big piece. Booyeah! Go up and name this
aw_avatar (see pic below). It's official now.

Rotation
But, we're not quite done yet. One more important step, or your avatar
is going to be floating around like Han Solo in transport when he got
encased in carbonite. For whatever reason, and I have never learned the
technical aspect of this, you need to rotate the avatar so it is laying
on it's back. Exact number rotations? x=90, y=0, and z=180 (see jedi3.jpg).
That rotation, coupled with the aw_avatar name, tells AW that this is
no ordinary object....this is now a moving machine! >:D Save it up...we'll
call this great looking guy Jedi, and then you can either zip it up as
a .cob, or you can convert it into an .rwx to see what it looks like in
computer language and then zip it up. Either way, it's ready to go into
your OP and earned a place in your avatar.dat. Of course, not all avatars
are human. But the basics apply for any avatar, it just requires a little
thinking as to how you need to glue it.
Avatars are by far, one of the hardest things to make for AW. It takes
a lot of practice, and sometimes, experimentation, to get the right effect
for the more unusual avatars. Here's your chance to try it out. May the
force...be with you. ;)
| |