|
|
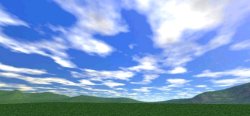
SkyboxesCourtesy of Oleyo
Wahoo! AW 3.2 has been released and there is now more fun stuff than ever! One of my favorite additions to this version of the browser is the support for skyboxes. Everyone should consider adding a skybox to their world as they can add a great sense of depth. But many of us may wonder, "What IS a skybox and how can I make one?" What is a Skybox?A skybox is a 3D model that surrounds your entire field of view. It can be any shape but it is usually in the shape of a box. It rotates with your camera view perfectly so you don't get any of the strange scrolling speeds that can be seen when using a panorama. You can never get closer to the skybox so it maintains the illusion of being very large and distant. Another behavior of the skybox is that it renders behind everything else in the scene, so it always seems to be in the distance. However to make a "real" skybox requires a bit more than just putting our panoramic textures on a box or cylinder. How do I make a Skybox?Getting the Textures If we were to just take some landscape textures and put them in a box then we would see distortion in the corners where the texture is farther away from you than they are at the sides of the box. To get a true skybox, we need to take six camera shots inside a 3D environment…one for each face of the cube. This way, because of the camera, the screenshots will be stretched a bit to compensate for the corners of the box. The program I like to use is Bryce 4.0 by MetaCreations.
www.metacreations.com
To get the desired images you will need to render images with your camera set to 90 degrees (one quarter of your box) and then turn 90 right, left, back, up, and down. If you do use Bryce, and want a 90-degree aperture, you will actually have to set the camera to 112.5 degrees (90x1.25). This is due to an old bug that they kept around for the purposes of backward compatibility. Here is a great link for some info on creating and using skyboxes:
As always when creating content for AW, It is very important to keep the download size in mind. Having textures that aren't big enough can easily destroy a skybox's illusion. A blocky backdrop will not convey the sense of depth that we hope to achieve. Here are some pointers on texture size:
Now that we have our textures, lets talk about the skybox model. Making the Box Size Many people believe that the skybox is a massive box that is so big that it surrounds everything that you see in AW. This is not the case. The skybox can actually be any size as your distance to it never changes and it always renders behind everything no matter what. I usually use a 2m square box, which is the default cube size in Truespace and is easy to work with. Shape Remember to make sure it is a cube; since your texture maps will be made for a square box. You may however want to consider chopping off everything below the horizon line in order to achieve a smaller download. If you decide to do it this way then you don't need to change how you get skybox textures. Simply take an image as normal, and cut away the bottom half. Ex. If the texture was 256x256 then cut away the bottom half so it is 256x128. Do the same with your box. Instead of being 2m in all dimensions, make it only 1 meter tall (with almost the full meter above the horizon…remember that the reason for cutting off the bottom is because it is going to be out of site most of the time). Here are some other things to remember when building your skybox:
I hope this has been an informative resource. Happy Building!
|
| Active Worlds | Newsletter Home | Newsletter Archive | Contact Us | Disclaimer |